RPG icon editor
The Icon Editor is not just an image making application that you can use in the RPG map editor or when creating worlds in the hex map editor. Our RPG icon editor is a tool that allows you to create SVG icons of any format. We`ve even helped our friends create logos and illustrations for other projects with our application.
This application is probably the most difficult one to understand and master in the entire RPGInferno ecosystem, even more difficult than the map editors, simply because in those everything is quite straightforward, while the icon editor has so many intricacies and subtleties that sometimes even we — developers — forget what it can do.
It is worth noting that this application will not let you create three-dimensional objects. You can imitate volume in different ways, but the editor`s main task is to create flat 2D icons, which have good scala-bility without quality loss.
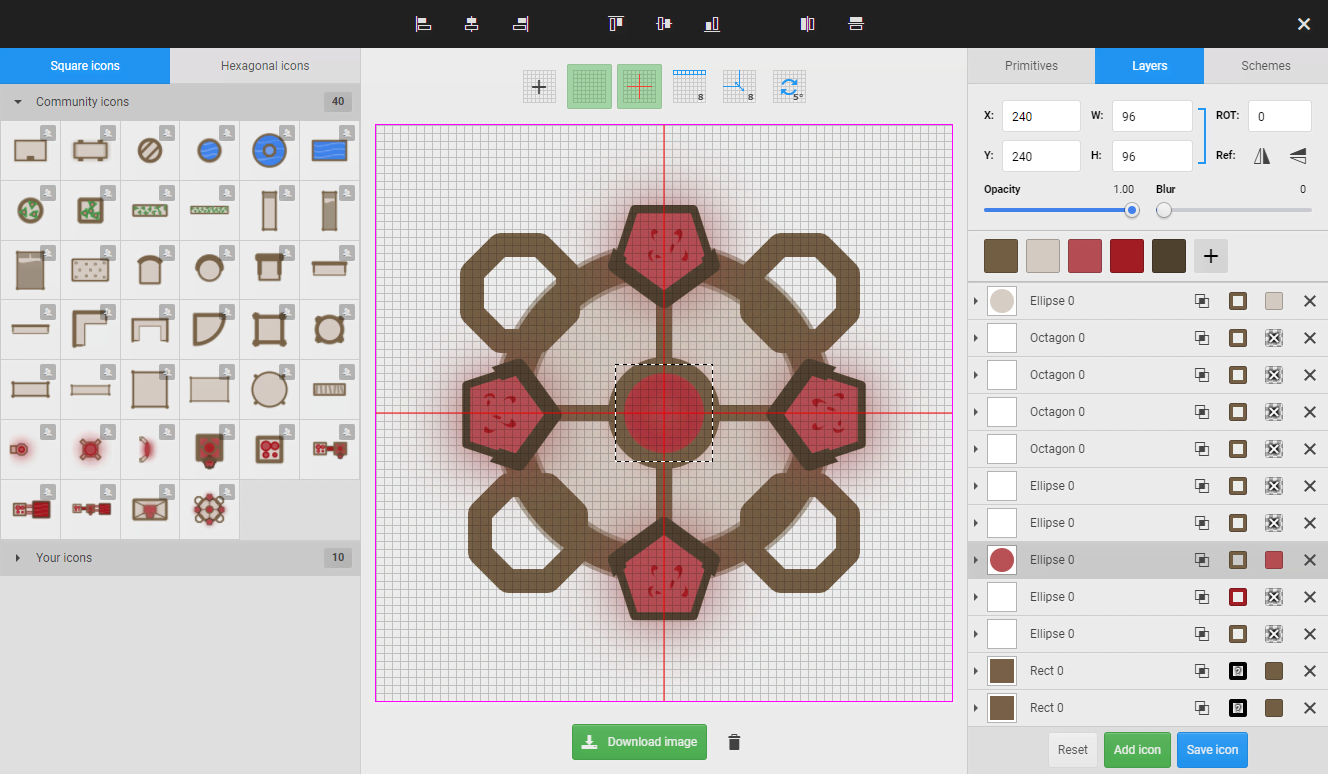
Editor description
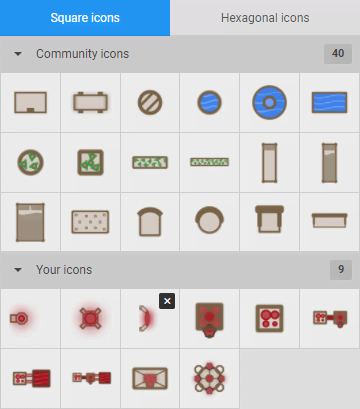
The icons editor is an overlay application which is available at all times, so you can add and edit icons while creating RPG or hex maps. All changes will be applied immediately to the current map and to all your maps.
We strived to make the editor as simple and intuitive as possible and, as with the object editor, this editor has a familiar layout: left panel, central canvas, right panel and toolbar.
Left panel — the left panel is divided into two sections like in the transition editor for textures. This is done because icons for RPG maps and hex maps are made differently. While there are 8 neighbours for each cell in local maps, there are only 6 neighbours for each hex and because of this we have created 2 types of icons: square and hex ones respectively. Use the tabs in the left panel to switch between these modes.
Each mode has its own list of icons; the list contains all the available colour icons; like in the other apps the list is divided into 3 categories: community, subscriptions and your personal schemes.
- Editing
- while you can select any icon, only your personal icons are available for editing, but this doesn`t prevent you from creating copies of the icons that are available as community or subscription ones.
- Deleting
- your icons have a delete button, a double click on which will delete the icon; please note that if you delete an icon, all of its occurrences will be removed from all existing maps.
- Sorting
- ordering is only available for personal icons, just click and drag icons to change the order. All chang-es are immediately applied in the RPG map editor interface and in the hex editor as well.
Central canvas — unlike in the other applications like the road editor or the texture editor, in the icon editor the central canvas is interactive and probably the most important tool for creating icons.
The canvas consists of three sections where the controls are located: the settings panel, the interactive canvas and the bottom panel.
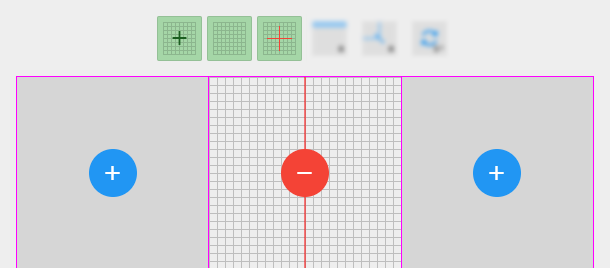
Settings panel — there are six buttons here: Sectors, Toggle grid, Toggle sight, Grid step, Resize step and Degree of rotation.
- Sectors
- depending on the selected mode (square or hex), you will have between six and eight neighbouring sectors; this is done to allow creation of large collage style icons. By clicking on Sector button, you will switch to a special mode where you can enable and disable the display of neighbouring sectors. Please note that disabling a sector does not remove the primitives that you have placed in this area: they will simply be cut out when the final icon is rendered.
- Toggle grid
- the grid certainly helps when designing an icon, but is not always needed. Sometimes you need to disable the grid to look at the result of your work without any distractions. Be aware that the grid is only disabled visually.
- Toggle sight
- the sight is simply a way of marking the geometric centre of the canvas for you to see what the reflection will be relative to.

- Grid step
- to simplify your work with the editor, we`ve created a system that allows you to specify the step by which the primitives move as they are positioned, so it is much easier to manage and arrange your icons. For example, aligning icons can be quite a painful process, but with the grid reference system, you`ll be able to do it just perfectly. To select a step, simply hover over the Grid step button and select the desired step from the dropdown menu; the following grid sizes (dimensions in pixels) are availa-ble: 1, 4, 8, 16, 24, 32, 40 and 48.
- Resize step
- as with the grid size, it is convenient to be able to change the size of primitives in fixed steps. Just like with the grid step, hover over the button and select the desired size step (size in pixels): 1, 4, 8, 16, 24, 32, 40 and 48.

- Degree of rotation
- sometimes you need to rotate primitives: trees may be misaligned or you want to make a leaning tower of Pisa. But as in the previous cases, rotating by one degree is not convenient, so we`ve created a way to adjust the angle of rotation. Hover over the button and select the angle by which you want your primitives to rotate (dimensions in degrees): 1°, 5°, 10°, 15°, 20°, 30°, 40° and 45°.
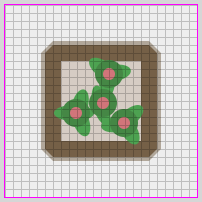
Interactive canvas — in this section you will interact with the primitives – move, resize and rotate them. Also, if you hold down the "ctrl" button, you can select a large number of primitives using the selection frame and move them all together. Once you have selected all the needed primitives, a collective frame will be created that you can use to move the group.
When you hover over primitives that are on the canvas, you can click on them and this way enter the editing mode of the particular primitive: all necessary controls will be activated on the right-hand panel. On the canvas we only need the frame containing the primitive; if you hover your cursor over it you will see 3 squares, two of which are black and one is pink; you can change the size in the respective planes using the squares and next to the pink square you will find an area you can use to rotate the primitive on the canvas.

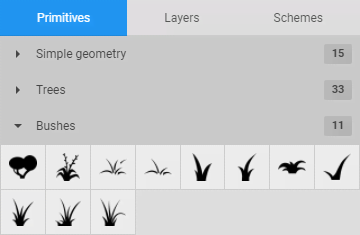
Right panel — this panel contains the main controls for editing specific primitives that are located on the canvas. Unlike other editors, this section of the editor has three modes: Primitives, Layers And Schemes.
- Primitives
- this mode contains all basic elements that you can use for creating icons; all primitives are divided into categories that can be collapsed and expanded. To add a primitive to the canvas, click on it in the right panel and drag it to the canvas, then left click on the canvas and the primitive will be placed in the position you want.
- Layers
- here are the controls that allow positioning, decorating, choosing colour (palette), selecting layers.
Primitive positioning panel is available only when you are editing a primitive (to do so, select the primitive from the list of added primitives). This panel has the following control options:
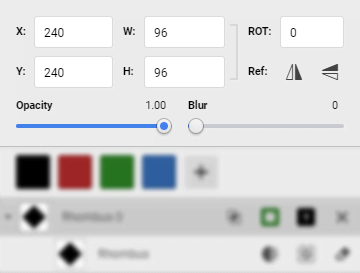
- X
- position on the coordinate axis X, you can change the position manually using the keyboard, note that this field is affected by the selected grid step. When placing the cursor in this text box, you can change the value by the grid step size using the arrows.
- Y
- position on the coordinate axis Y, you can change the position manually using the keyboard, note that this field is affected by the selected grid step. When placing the cursor in this text box, you can change the value by the grid step size using the arrows.
- H (height)
- determines the height of the object; as with coordinates, you can either enter numbers on the keyboard or use the arrows. Note that this field is affected by the step size.
- W (width)
- determines the height of the object; as with coordinates, you can either enter numbers on the keyboard or use arrows. Remember that this field is affected by the step size.
- Proportions toggle
- if you activate this button, proportions of the primitive will be maintained: if you change the size of the primitive, the primitive will not lose its original proportions.
- ROT (Rotation)
- here you can see the value of the primitive`s rotation in degrees, relative to the original position. You can enter numbers from the keyboard, the value will be corrected based on the rotation step size which you can edit on the central canvas. Keypad arrows will change the value by the size of the rotation step.
- Reflection
- the option to reflect horizontally and vertically is available as two buttons; by clicking on them, you reflect the primitive in the appropriate plane.
- The decorations of the primitive
- are provided as Blur and Opacity sliders.
-
- Opacity
- is applied to the primitive as a whole, where 0 is completely transparent and 1.0 completely opaque.
- Blur
- is a very useful tool for creating shadows: just copy the element and apply this decoration to it.
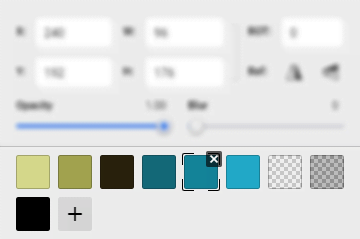
Palette system — when you create an icon, you might happen to apply quite a few different primitives. In the first iteration of this application we created a large number of icons for our local RPG map editor and it turned out that we needed to apply to each of them the colour schemes, that are available in the RPG Object Editor... Needless to say, when you have 20 primitives on the canvas and you need to make 5 colour schemes, the process promises to be tedious, because you need to apply a dozen colours to some of the primitives. In this regard, we decided to develop a palette system, that allows to create a limited number of colours and then apply them to primitives.
This way we solve a huge problem — with the help of palettes we can easily create colour schemes for icons. The minimum number of colours in a palette is 1. If you only have one colour, you can`t remove it.
To add a new colour to the palette, just click on the plus icon and a new colour will be added.
To edit a colour, click on the colour square in the palette and you`ll see the colour editing interface; unlike in the text editor, we made a truncated version of the colour editor in overlay mode.
To remove a colour, double-click the cross in the corner of the colour sample. As with the texture editor, a double-click is required to confirm.
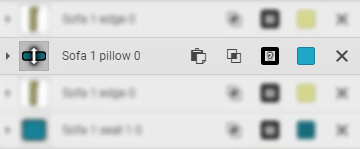
List of current primitives — this list contains all the primitives that are being used to create an icon. Each primitive may contain a set of parts of which it consists, for example, a bush with berries may have three constituent parts: leaves, branches and berries themselves. In our icons editor you can edit each part of the primitive separately, thanks to this approach we can achieve stunning flexibility. Each primitive is presented as a single list entry, which has the following set of controls:
- Expand
- see all the parts of the primitive and edit them as needed.
- Preview
- the current state of the primitive.
- Name
- if you point at the name, the primitive will be highlighted on the canvas so that you can see where it is located. Click on it to enable editing mode for the specified primitive; if the primitive has already been selected, you will disable editing mode.
- Duplicate layer
- create a duplicate of the primitive that will immediately be placed next to the primitive from which the copy was made.
- Delete primitive
- same as in the other editors; for example in the texture transition editor, just double-click on the cross and the primitive will be deleted.
- Sorting primitives
- by default all primitives are added to the end of the list, but no one prevents you from resorting the list, just grab the primitive preview and reorder the list the way you want.
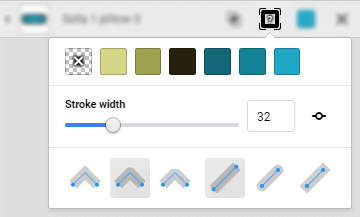
-
- Stroke
- this is quite simple: you can use the colour palette to select the colour of the stroke. The colour list is dynamically updated, so that the colours are always in sync with the current state of the palette.
The colour which is shown as the transparent sample with a cross is particularly noteworthy: if you select this option you will disable the cut mask. - Stroke thickness
- works the same way as the cut mask, as does the button that controls the steps of thickness. So does the panel with line curvature styles and line end rounding. These are typical options in our RPG icon editor.

-
- Color
- this simply displays a list of the current palettes; Color specifies the general colour of the primitive, parts of the primitive can inherit it.
The sample with a cross in this case works in a special way: if you click on it, the whole primitive will drop out of the cut mask, but the cut mask outline will remain — this way you can cut out the silhouette of the primitive in other objects.
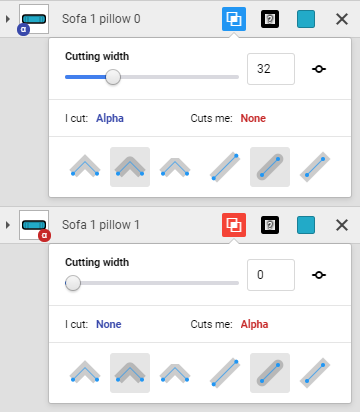
Cut mask — is a rather complex subsystem to understand, and it will take some time to master all its features, so don`t worry if you don`t grasp it all at once, just practise and experiment.
Suppose you need to draw a ring, how do you do that? Well, normally you would take a circle and cut a hole in it, but that`s not an option in our editor — we only have circles. So what do we do? We need to make two circles, one larger in diameter and the other smaller and use the smaller circle to cut out a part of the circle with the larger diameter. To do this we need to use two settings: whom the current shape cuts ("I cut") and who cuts the current shape ("Cuts me").
We have made a list of layers for cutting and you can assign these layers to primitives. For example, if you assign the ALPHA layer to the large circle as the layer that cuts the current shape ("Cuts me") then this will mean that all primitives that have the ALPHA layer in the "I cut" field will be cutting out parts of the large circle. So to create a circle in the big circle we set "Cuts me: ALPHA" and on the small circle we set "I cut: ALPHA". This way the small circle will cut out a part of the big circle, but nothing will change in appearance. The reason is, though the cutting has happened, the segment we`ve cut out is covered by the small circle.
You can use the "Cutting width" slider — it creates an outline around the shape that cuts out other objects; if you move it, you will notice that the cut out circle will start to appear around the circle, but it`s still not what we need.
It is also worth noting the "Step per 1 unit" button. If you turn this option on, the stroke will change at the step that is set as a single pixel in the local RPG map editor or the hex map editor.
So, we still can`t finish our ring: a small circle remains in the centre, how do we get rid of it? Well, that`s easy, just set "Cuts me: ALPHA" for the small circle — this way the circle will cut out all those that are being cut out by alpha, including itself! And voila — mission accomplished!
The cut mask has 6 additional buttons that control how lines are connected in primitives and the way the ends of the lines are displayed; we will not go into details about their functionality, because it is clearly shown by their previews.
When you click on the button that expands parts of the primitive, you will see a list of all the parts that are available in a specific primitive and all the controls for the parts, such as:
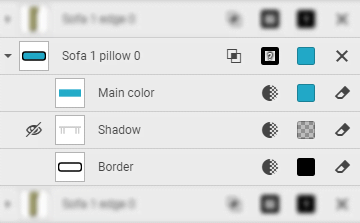
- Hide
- by clicking on the "eyes" icon you can completely hide the chosen part. For example, you can remove branches of a tree leaving only leaves.
- Preview of the primitive
- with this preview you can see what part of the image is made by a specific part.
- Opacity
- this slider controls the transparency of the object which makes a part of the primitive. This is not the same transparency that you can specify by colour.
- Fill
- works exactly the same as the colour of the whole primitive, only the colour is applied to a specific part of the primitive.
- Reset colour
- when you click this button, you enable colour inheritance mode, in which the colour of a part will be inherited from the colour of the whole primitive.
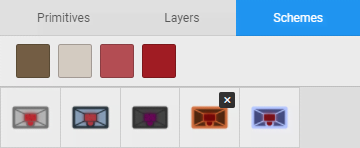
Primitives schemes — this mode is activated with the Schemes tab in the right panel. This section is only available for icons that are stored in our database. This system is similar to the one that is used in the RPG editor, if icons are viewed as objects.
When you switch to this mode you will see that the right panel interface is reduced to a list of palettes and that a list of colour schemes will appear. With this mode you can quickly create new colour schemes for an icon, easily edit the colours in the palette and save or add new colour schemes. The corresponding buttons are available in the footer of the right panel.
Colour schemes can be deleted with a double click on the cross. Colour schemes that do not belong to you will have a pictogram in the corner.

Toolbar — in the primitive editing mode, additional controls for the primitive appear on the user panel above the canvas; there are three categories: horizontal alignment, vertical alignment and reflection along an axis.

- Horizontal alignment — using the buttons in this section, you can align the primitive to the left edge of the canvas, to the horizontal centre of the canvas, and to the right edge of the canvas.
- Vertical alignment — the buttons in this section allow you to position the primitive at the top edge of the canvas, at the vertical centre of the canvas, and at the bottom edge of the canvas.

- Reflect horizontally/vertically — the sight which you can turn on and off, shows the axes along which you can mirror the object. If you click on Reflect horizontally, the primitive will be placed on the other side of the vertical red line, and will be positioned at the same distance as previously. This also applies to vertical reflection.
Conclusion
RPG icon editor is the most advanced application of our ecosystem. Using it, you can make absolutely any 2D icon you want, the only limit is your imagination. If you find yourself missing a piece of jewellery or a fancy store while using our RPG map editor, you will most probably be able to come up with a minimalistic design and create those objects with our RPG icon editor.
Of course, you are not limited solely to making icons with our editors: create all kinds of images, including game and web graphics. We do not impose any restrictions on the use of our application — create without any constraints, we will only be glad. And please don`t forget to share your opinions with our team in the Discord channel.
